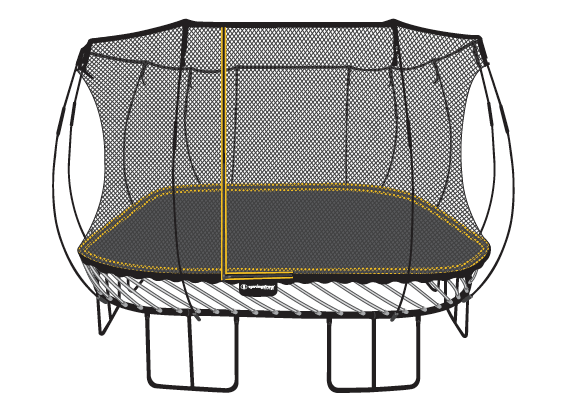
Installation instructions for Jumbo Square Trampoline
Overview and Preparation
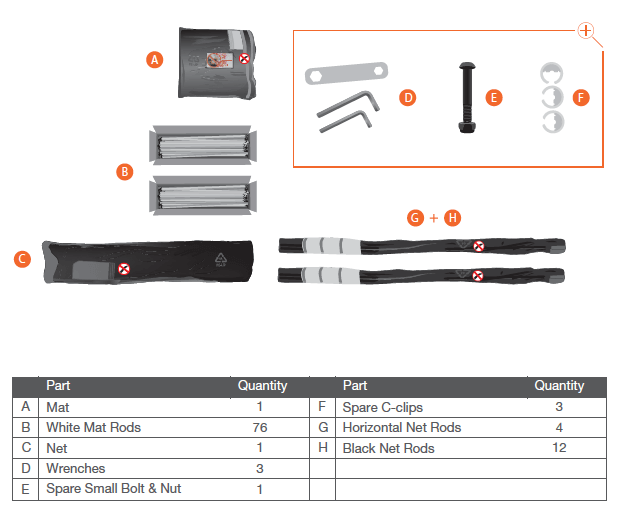
Step 1: Laying out the trampoline parts
Layout all parts listed as shown.
Tip - Assemble the trampoline on a flat surface
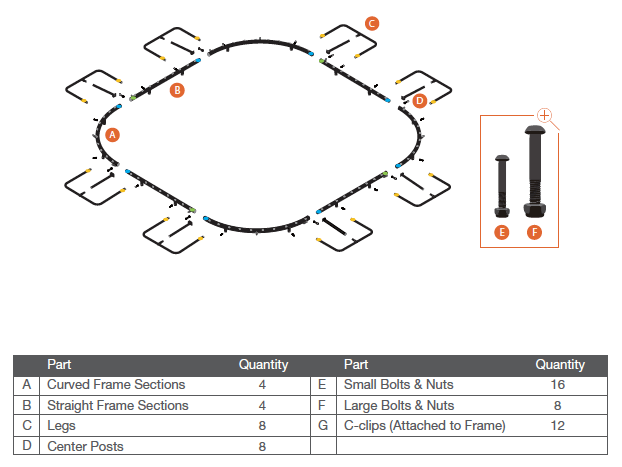
Step 2: Staging the trampoline frame
Lay out the remaining frame parts as shown. The coloured stickers all face upwards.
If you are missing any parts, please contact Springfree Trampoline directly.
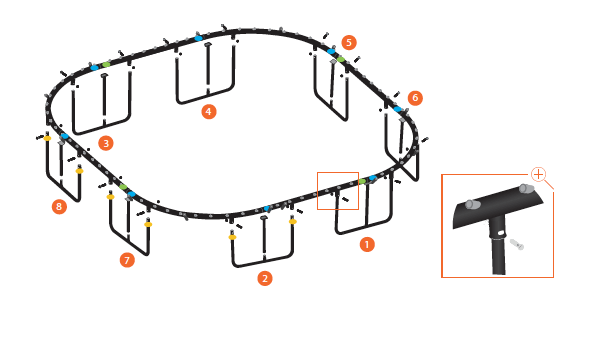
Step 3: Fastening the legs to the frame
WARNING - Use the tools provided to fasten the nuts. Do not over tighten the nuts. Do not use power driver, torque wrench, or drill.
TIP - Fastening the final two frame sections often requires additional effort. Two people may be required for assembly.
- Connect and fasten one frame section at a time together with the large nuts and bolts.
- Attach a center post to the middle of each leg section.
- Then, in the order shown in the illustration, lift the frame and evenly put the legs into the leg hole on the frame. We recommend that two people work together to complete this step. One person to hold the frame up and horizontal, and the other person to put the legs into the leg hole.
- Fasten each leg to the frame before going to the next leg.
Step 4: Laying out the mat
NOTE- Before proceeding, double check that all of the bolts and nuts are tightened. Use the tools provided to fasten the nuts. Do not over tighten the nuts. Do not use power driver, torque wrench, or drill.
- Lay out the mat with the yellow stripes facing upwards inside the trampoline frame.
- The blue tags on the mat should approximately align with the blue stickers on the frame.
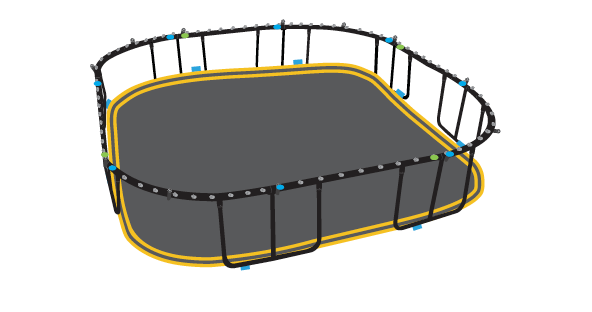
Step 5 - Positioning the net
NOTE - As you install the white mat rods into the mat rod sockets the net will become tight against the frame. Handle the net with care and be sure that it does not get caught or it may tear.
- Locate the green tag on the bottom edge of the net and match it with one of the green stickers on the frame.
- Holding the net so that the green tag is facing you, gently place the rest of the net inside the frame as shown. DO NOT let go of the green tag.
- Put a white mat rod through the hole to the immediate left of the green tag in the net and then into the mat rod socket next to the green sticker.
- Then, working carefully around the frame, insert the remaining white mat rods through the net holes and into the corresponding mat rod socket. When finished, the net should be stretched tightly around the OUTSIDE of the frame.
- Be sure that the white mat rods are seated down to the bottom of each mat rod socket.
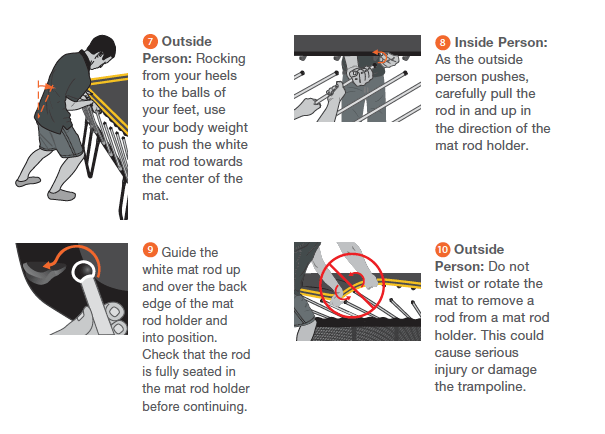
Step 6, 7 & 8 - Installing the mat
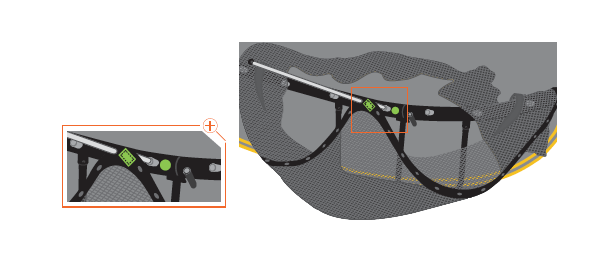
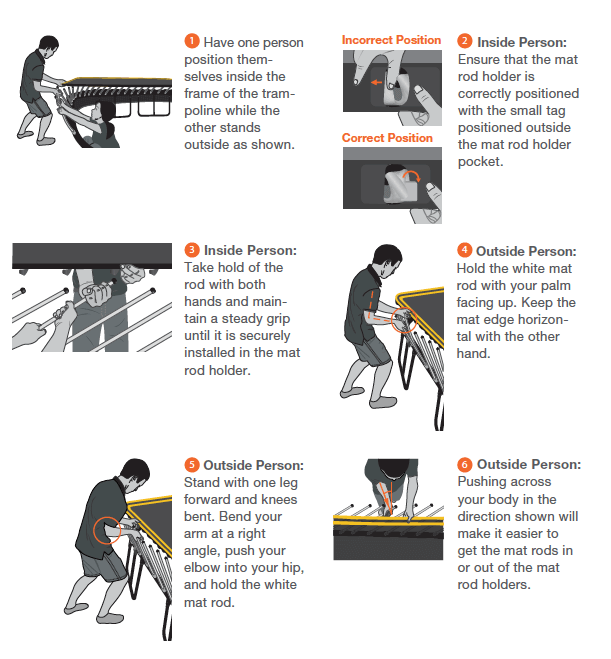
Step 6A
WARNING - Treat any loaded rod with caution until you are sure it is properly installed or uninstalled. Keep your face well away from any loaded rod.
WARNING - Both people must maintain a steady grip on the rod until it is securely installed in the mat rod holder.
NOTE- Before you install the first white mat rod into a mat rod holder, read the instructions in Step 6B and 6C.
NOTE- Two people are required for assembly.
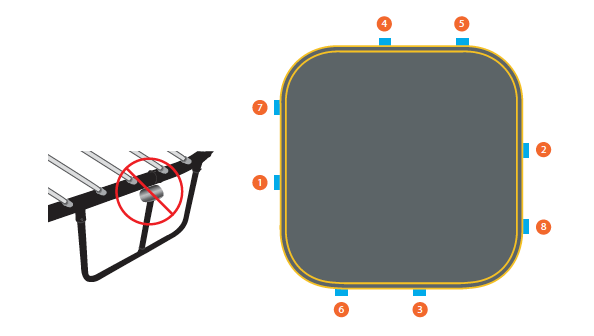
NOTE- Following the sequence shown spreads the tension evenly across the mat. If you do not follow this sequence, it will be very difficult to attach the mat.
- Check that the center posts of the leg sections are correctly seated under the trampoline frame. If they are not, adjust them now.
- Attach one white mat rod at each of the locations shown - where the blue tags on the mat match with the blue stickers on the frame.
Step 6B
Step 6C
Step 7
WARNING - Treat any loaded rod with caution until you are sure it is properly installed or uninstalled. Keep your face well away from any loaded rod.
NOTE- Follow the mat rod installation sequence. Do not install multiple mat rods in one location. If you do not follow this sequence, it will be very difficult to attach the mat.
NOTE- Each time you circle the trampoline, check that the center posts of the leg sections are correctly seated under the trampoline frame. If they are not, adjust them before installing any more rods. You may need to uninstall rods to release the tension.
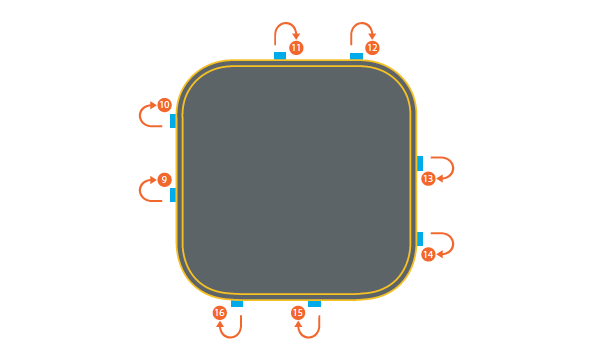
- Go back to the very first rod you attached to the mat in Step 6a. Now, moving clockwise, attach ONE white mat rod next to the initially installed rod.
- Moving clockwise around the trampoline, attach ONE additional rod next to each of the already installed rods as shown above.
- Continue circling the trampoline several more times following this sequence, installing only ONE rod per grouping, until all the white mat rods are attached to the mat
Step 8
WARNING - Do not use the trampoline until it is completely assembled. Failure to follow these instructions may cause rods to break or eject from the trampoline frame.
NOTE- Check that the net is not caught on the trampoline frame or the bolts – if the net catches, it may tear.
- Moving clockwise around the frame, carefully slide the net up to the top of the white mat rods.
- Starting at a corner, carefully pull the net up over the edge of the mat. It is normal for the net to be tight
- Working around the frame, lift the rest of the net into the center of the mat. Ensure that the bottom band of the net is pulled all the way to the top of the white mat rods.
Step 9 & 10 - Raising the net
WARNING - Treat any loaded rod with caution until you are sure it is properly installed or uninstalled. Keep your face well away from any loaded rod.
- Locate the yellow tag along the top edge of the net.
- Slide a horizontal net rod into the pocket at the yellow tag. Tuck the end of the rod into the pocket.Once it is fully inserted, check that the rod is centered within the pocket.
- Repeat on the other sides of the trampoline.
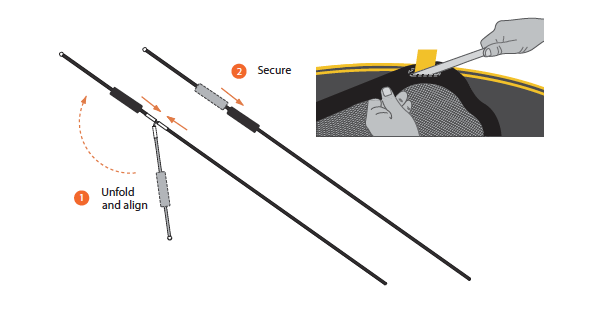
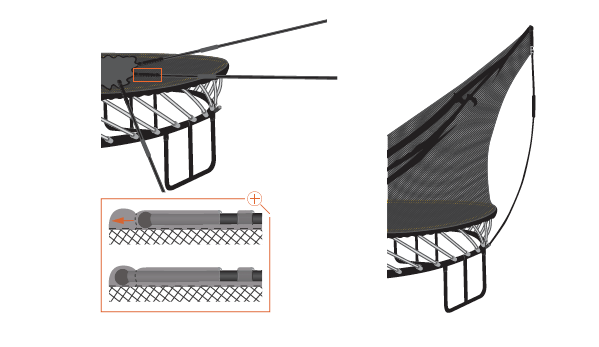
- Assemble the black net rods as shown.
WARNING - Never attempt to remove a black net rod from its net rod pocket or disengage (unlock) the rod sleeve while the black net rod is under tension.
- Insert ALL of the black net rods into the net rod pockets at the top edge of the net. Push the rod up into the pocket and past the catch. You will feel some resistance as the ball is pushed through.
- Insert the bottom end of the black net rod into the net rod socket on the trampoline frame. You will hear a click when the black net rod is fully seated
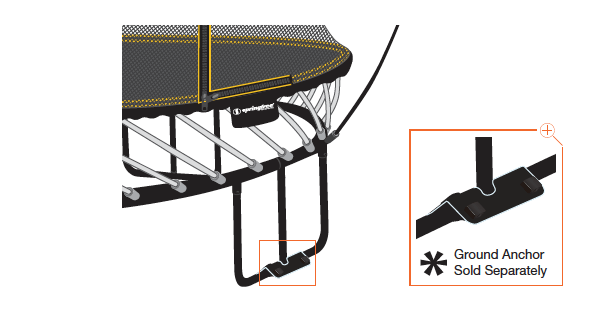
Step 11 - Increasing trampoline stability (optional)
WARNING - Make sure you read all warnings and precautions found in the User Guide before using the trampoline.
WARNING - If you anticipate severe weather, consider lowering the enclosure, moving the trampoline to a sheltered location or disassembling the trampoline completely.
- If your trampoline is installed in an area susceptible to high winds or if you are looking for increased stability for your trampoline, we recommend the Springfree Ground Anchor, which has been designed specifically for the Springfree Trampoline. Ground Anchors can be purchased online here.
Congratulations! You have successfully installed your Springfree Trampoline! Happy bouncing!.